Vier D
Home
Archiv
Seminare
Nachrichten - Twitter
4D Expertise
Gebrauchtes
Mac + iPhone: zu verkaufenFinden
Geo-Themen + Projekte
GoogleMap-Integration • GeoDDDD • Database Publishing • Database PhotographyVerschiedenes

15. Aug. 2014
Touch UI and 4D
In der Werkstatt soll ein 4D Client aufgestellt werden. Kommt Ware rein oder wird ein Werkstück fertig, meldet der Ausführende in der Werkstatt das in der Datenbank an. Für einen normalen Büro-Arbeitsplatz ist es dort zu staubig und zu feucht. Tastatur und Maus ziehen den Dreck und die Feuchte an und überstehen das nicht lange. Das Ziel ist so wenig wie möglich Technik in die Werkstatt zu stellen, also nur ein Touchscreen an der Wand – einer für mehrere Mitarbeiter. Ist der Touchscreen zerkratzt oder sonstwie kaputt, wird er ersetzt.
Kein iPad, kein Surface Pro
Naheliegend: ein iPad installieren und dort über ein Webformular am 4D Server hängen. Technisch kein schwieriges Unterfangen. Doch die Fläche eines iPad ist sehr klein und es wäre eine zweite Entwicklungsumgebung, die zu pflegen ist.
Das Microsoft Surface Pro hätte den Vorteil einen 4D Client unter Windows 8 als Touch-Arbeitsplatz einsetzbar zu haben. Wir blieben in 4D. Auch hier ist die Monitorfläche klein und ein Surface Pro kostet so viel wie zwei iPads.
Die sinnvollste und preiswerteste Methode ist ein 23" Touch-Monitor *. Davon bekommt man zwei zum Preis eines iPad. In der Werkstatt an die Wand hängen und von einem Mac mini im saubereren Nebenraum betreiben. Wir bleiben in 4D.
So wird es gemacht!
Simpel
Wir müssen ein 4D-Formular für den Bedarf in der Werkstatt in die bestehende Lösung einbauen und mit dem bestehenden Code verknüpfen. Das Formular muß aufs Wesentliche reduziert sein.
Das Reduzieren auf das Wesentliche war keine leichte Aufgabe. Der erste Ansatz ist nun in Betrieb. Die nächsten werden besser mit den Rückmeldungen aus der Werkstatt.
Anmelden
Da mehrere Mitarbeiter am Monitor Daten eingeben, muß jeder Mitarbeiter sich anmelden. Zur Zeiterfassung ist bereits ein System mit RFID-Chips installiert. Also wird sich der Mitarbeiter mit seinem RFID-Chip auch am 4D-Server anmelden** – wie an der Kasse in der Kneipe. Verläßt der RFID-Chip den Rechner, wird der Mitarbeiter abgemeldet. Er kann das auch explizit tun.
Nur ein Fenster
Mehrere Fenster, Toolbars, Menüs und Paletten sind in der Werkstatt nicht praktikabel. Die Objekte sind viel zu klein, es sind nicht alle Optionen auf einen Blick sichtbar. Die Datenbank braucht den Wareneingang, fertige Packlisten und die Auslieferung von Waren. Außerdem soll ein Mitarbeiter sich Zeichnungen zum Auftrag ausdrucken können. Mehr nicht aber alles in dem einen Fenster.
Alles in groß
so wie in einer Präsentation über den Beamer. Keine Schrift kleiner 18 Punkt. Nur Eindeutiges, nur Wesentliches.
Dicke fette Buttons, keine Menüs
Die Oberfläche kann sich an den Vorgaben aus iOS7 für iPhone und iPad orientieren. Dort sind Button nur noch Texte in großer, farbiger Schrift und leicht mit dem Finger zu treffen. Buttons mit mehreren Zuständen und/oder graphischen Finessen dienen dem Zweck nicht. Tatsächlich sollte alles Sichtbare reagieren wie ein Button. Klick auf eine Zeichnung zeigt diese monitorfüllend an. Die Auftragspositionen sind groß genug, um mit Abstand zum Bildschirm lesbar zu sein, und ein Klick auf die Positions-Zeile öffnet weitere Infos und läßt die hergestellten Anzahlen eintragen.
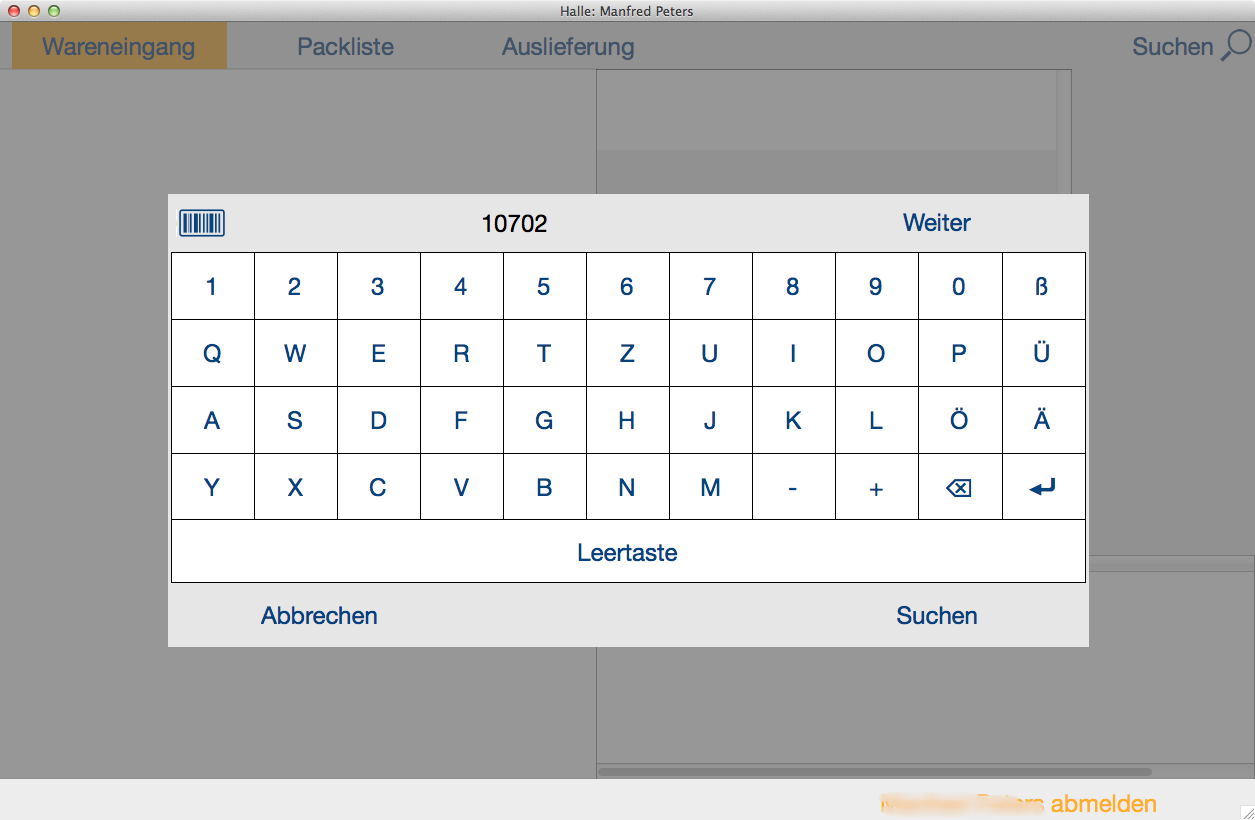
Eingabe über virtuelle Tastatur
Ganz ohne Tastatur geht es nicht. Auftrags- und Lieferschein-Nummern sind zu suchen und Anzahlen sind einzugeben. Auftrags- und Lieferschein-Nummern können Buchstaben enthalten, Leerzeichen, + und -, Fehleingaben müssen löschbar sein. Wir haben zwei Tastaturen als 4D Form-Widgets angelegt, die eine mit Zahlen und Buchstaben und eine andere als Ziffernblock.
Buchstaben und Zahlen
Wird gesucht, erscheint die Tastatur mit Buchstaben und Zahlen. Klick auf einen der großen Buttons setzt den geklickten Wert in die angezeigte Variable ein. Das Layout ähnelt dem der deutschen Tastatur.
Der 4D-Code ist erstaunlich simpel. Jeder Button ruft DBZ_Tastatur ("Button_Tastatur";Self) auf. Dort wird mit $getString:=OBJECT Get title($P_Self->) die Beschriftung des Buttons abgefragt und der Zielvariablen zugewiesen. Button verschieben oder neue Button-Beschriftung und ein anderes Tastatur-Layout ist aktiv.
Löschen, Zeilenschalter und Leertaste sind gesondert abzufangen.
Vorsicht, wenn Xliff-Beschriftung, dann liefert OBJECT Get title den ":xliff:@"-String aus. Also prüfen und abfangen.
Das Barcode-Symbol zeigt an, daß die Eingabe auch über einen Barcode-Scanner erfolgen kann. In Verwendung sind hauseigene EAN-Codes, also solche die mit 2 beginnen.
Ziffernblock
Der Ziffernblock wird hier als Subform in der Subform Wareneingang verwendet. Abgefragt werden die Lieferschein-Nummer und die eingegangene Stückzahl.

Subforms
Die in V12 neuen Subforms des Typs Seite sind das richtige Werkzeug, um eine Touch-Oberfläche effizient umzusetzen. Einmal eine Tastatur erstellen, den Code wie Code für eine Komponente schreiben, und überall benutzen.
Wir haben nur das eine Fenster. Darüber ein Dialog-Fenster aufzumachen und Werte abzufragen ist keine Option - alleine schon wegen des ![]() Inactive Window-Cursors. Subforms in Position zu schieben und anzuzeigen funktioniert gut. OBJECT MOVE und OBJECT SET COORDINATES sind die Befehle dazu.
Inactive Window-Cursors. Subforms in Position zu schieben und anzuzeigen funktioniert gut. OBJECT MOVE und OBJECT SET COORDINATES sind die Befehle dazu.
Zum besseren Verständnis die Darstellung, wie sie in V12 notwendig war. Außerhalb des sichtbaren Bereichs sind die Subforms geparkt und werden bei Bedarf in den sichtbaren Bereich bewegt. Die nicht mehr benötigten werden wieder geparkt.
Seit dem Befehl OBJECT SET SUBFORM der V13 kann das weiter abstrahiert werden, braucht es nur mehr einen Platzhalter für alle Subforms. Sollte jemand anderes an dem Code weiterarbeiten, ist die dargestellte Fassung einfacher zu warten
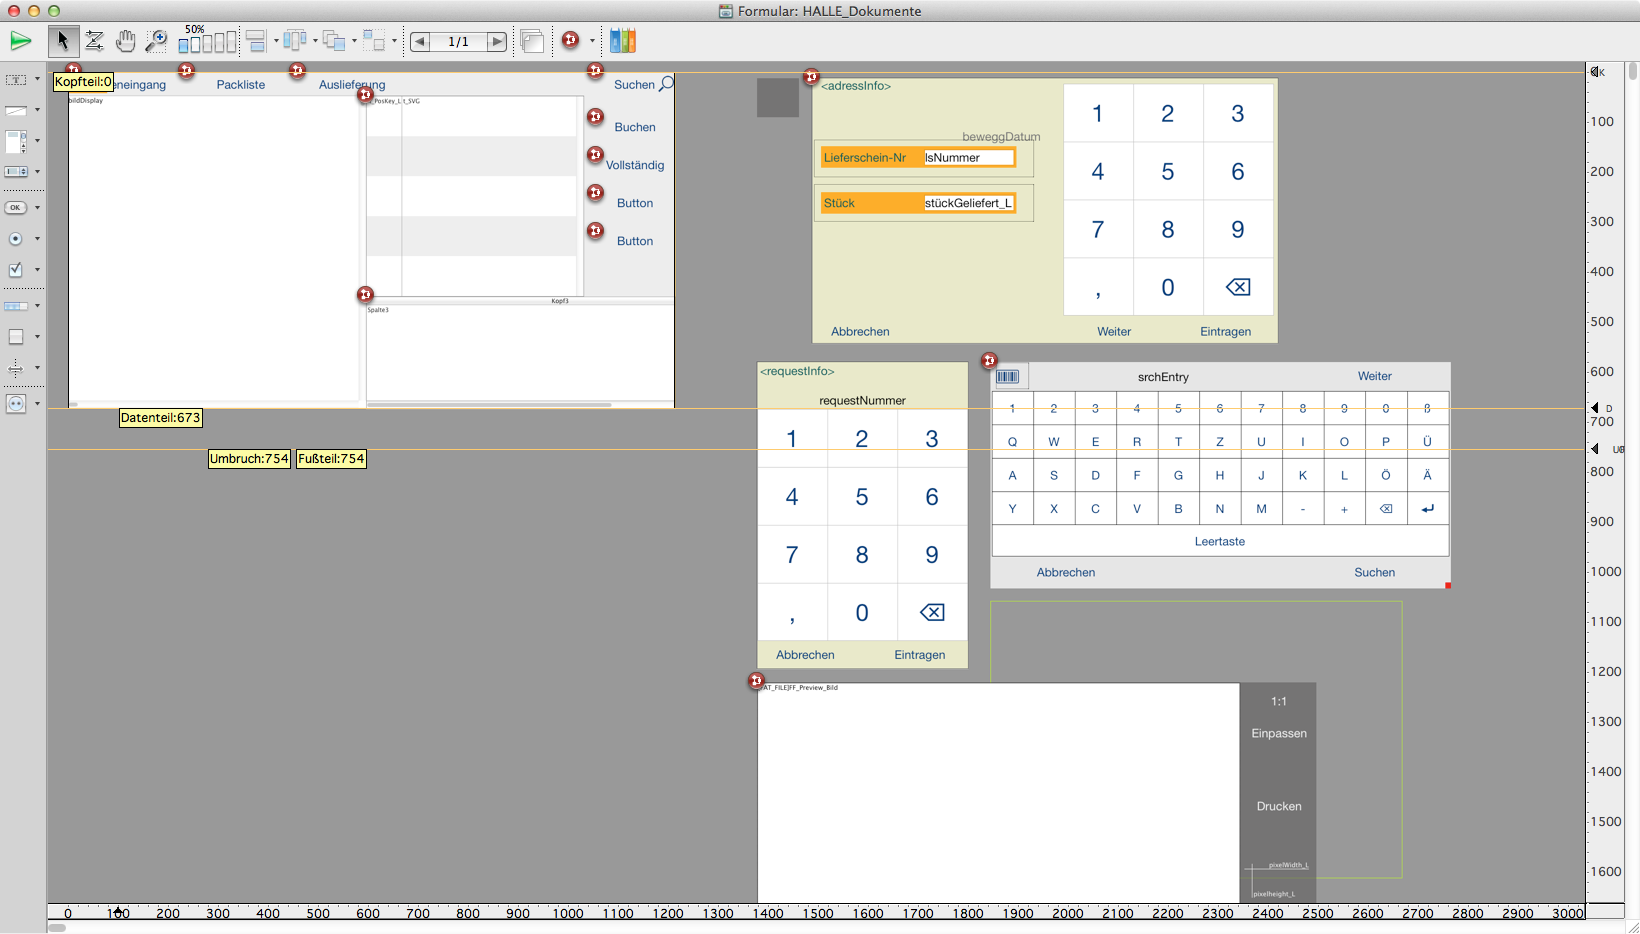
Zwischen den Eingabe-Objekten – hier Tastatur und die anderen Subforms – ist eine transparente Schicht einzufügen, die den Klick hinter die Subform unterbindet und das auch deutlich macht. Das kann ein PNG oder ein SVG mit Transparenz sein, als Graphik im Formular untergebracht – das graue Quadrat, oben neben dem Wareneingang.
Formobjekte wie in Layers organisieren
Damit das klappt, sind die Formobjekte in Schichten zu denken. Die Subforms werden immer ganz nach vorne gebracht, die eigentlichen Formelemente sind immer ganz nach hinten angeordnet. Dann kann die semitransparente Graphik eine Trennung herstellen kann. Inactive Window ade!
diese Animation ist kein Gif, wurde mit Hype erstellt. In die Fläche klicken, um die Animation neu zu starten.
* dieser Monitor funktioniert auch mit MacOS X.9. Klicken, doppelklicken, … ↵
** Der RFID-Chip Leser agiert wie eine Tastatur-Eingabe und wie Barcode-Scanner auch. Ist kein Mitarbeiter angemeldet wartet 4D auf Eingabe vom RFID-Chip Leser. Passiert länger nichts, meldet 4D den letztangemdeldeten Mitarbeiter ab. ↵
A 4D Client is to be installed in the workshop. When receiving goods and material or if a workpiece is finished, the worker has to update the database. That workshop is dusty and humid compared to a usual office. Keyboard and mouse are not going to last long. The goal is to put as few as possible gadgets in the workshop itself, reducing to the touchscreen on the wall - one touchscreen for several employees. If the touchscreen is scratched or otherwise damaged, it will be replaced.
No iPad, no Surface Pro
We could hang an iPad on the wall and connect to 4D Server by web-form. Technically not too difficult a task. But the sreen real estate of an iPad on the low end and it would be a second development environment, which is to maintain.
Microsoft's Surface Pro would have the advantage that a 4D Client for Windows 8 could be used as a touch workplace. We'd stay in 4D. Again, the sreen real estate is small and a Surface Pro costs as much as two iPads.
The most useful and for the best price is a 23 "touch monitor *. The screen will be operated from a Mac mini, which is installed in a room next door with cleaner conditions. That solution means two screens for the price of an iPad and we'd stay in 4D, one environment to maintain.
So we did!
Simple
We need to build a 4D form taylored to the demand in the workshop. This is an enhancement to the existing solution and uses existing code. The form must be reduced to the essentials, of course, which was no easy task. The first approach is now in operation. The next will get better with the feedback from the workshop.
Sign in
There is one monitor for several employees, so each employee has to sign in. Currently working-hours are tracked with a system that uses RFID chips. The employee is using his RFID chip to login on 4D Server, too ** - like the cashier at the pub. When the RFID chip leavs the computer, the employee is logged off.
Only one window
Multiple windows, toolbars, menus, and palettes are not practical in the workshop. The UI-objects are much too small and not all options would be visible at a glance. This is what the single-window-form should serve: get the count of incoming goods, dito finished packing lists and the delivery of goods. Additionally the employee should be able to check the drawings or print for easier handling. Nothing else.
Everything bigger than usual
similar to perfect presentations beamed to a wall. No font-sizes less than 18 point, content reduced to the essentials and to the point.
Big fat buttons, no menus
The user-interface can be based on the looks of iOS7 for iPhone and iPad. The buttons are text only in large font-sizes, colored and easy to tap with fingers. Buttons with multiple states and / or graphical finesses do not serve the purpose. In fact, everything visible should react like a button. Click on a drawing shows the drawing in full size. The line items should be distiguishable from a distance and clicking on the line-items opens more info.
Input via virtual keyboard
Some data has to be entered. Order and delivery numbers are to be queried for and numbers will be entered. Order and delivery numbers can contain letters, spaces, + and -, erroneous entries must be deleted. We have two keyboards created as 4D form widgets, one with numbers and letters and a numeric keypad.
Alphanumeric keyboard
If needed, the keyboard with letters and numbers appears. Click on one of the big buttons uses the clicked value to add to the displayed variable. The layout is resembling the german keyboard-layout.
The 4D code is amazingly simple. Each button calls DBZ_Tastatur ("Button_Tastatur"; Self). And this line of code $getString:= OBJECT Get title ($P_Self->) takes the button-label to add that sign to the target variable. Move a button or relabel the button and a different keyboard-layout is done.
Delete, Return and spacebar are to be supported separately.
Beware if Xliff-labeling, then OBJECT Get title delivers ":xliff:@" - strings. So prepare to intercept.
The barcode symbol indicates that the entry can also be done via a barcode scanner.
Numeric keypad
In this screenshot the numeric keypad is used as a subform of the goods-receipt subform. Which order-number and how many received. Either click the next-field or Button Weiter, which means Next, to set the cursor.
Subforms
The new to V12 subforms of type page are the right tool to efficiently implement a touch surface. Create a keyboard once, write the code as you would write code for a component, and use it anywhere.
We do have only one window. On top of that single window opening a dialog window and query for values is not an option - simply because ![]() the Inactive Window cursor would mess up. OBJECT MOVE and SET OBJECT COORDINATES are the commands to move subforms to where they are needed.
the Inactive Window cursor would mess up. OBJECT MOVE and SET OBJECT COORDINATES are the commands to move subforms to where they are needed.
To better understand I used a screenshot of the old fashioned arrangement as was necessary in V12. All the subforms are placed on the main-form, but parked outside the visible range. When needed they are moved into the visible range.
Since V13 and the command SET OBJECT SUBFORM the concept can be further abstracted, taking only a placeholder for all subforms. The V12-fashioned way is better comprehensible for the second and third guys working on that form.
Between the input objects - here the keyboard and the other subforms - is a transparent layer inserted that prevents the click behind the sub form. This can be a PNG or SVG with transparency as a graphic on the form - the gray square, next to the goods receipt.
Organizing form objects as in Layers
To make that work, the form objects need to be thought of as organized in layers. The subforms are always brought all the way forward, the actual form elements are always positioned all the way back. Then, the semi-transparent graphics can produce a separation. Nor more Inactive Window-cursor!
This animation is not a gif, I used Hype to create it. Click in the area to start the animation again.
